Sunday, July 29, 2012

For the Lefties


This week we were assigned the Oyster stitch. Despite the good instructions on Sharon’s website and the great video on Mary Corbet’s website I couldn’t get the hang of it. I tried all the normal tricks for left handed people like flipping the pictures or turning my laptop upside down but it just wasn’t working. I don’t remember how many times I ripped out my stitches and started again. Finally I took a long hard look at the pictures and started again. I decided that maybe I was going in the wrong direction so I switched the way I was working my scribble. Then I realized my twist wasn’t correct. It was twisted but the starting thread was on top and in looking at the pictures it should have been underneath the second leg of the chain. Of course I wasn’t trying to do single stitches either, I wanted to continue with my scribbles and so I needed to do it as a chain.
I finally got the hang of it and after doing quite a few of them I decided to take pictures of my steps. I’m sharing them here just in case there is another lefthander that is still struggling with this stitch. I really like the way it came out although they aren’t all perfect. But perfect is overrated right? 
Click on any photo to enlarge it for more detail.

Step one: 
Bring the thread to the front of  your work. If you are working a continuous line you only need to do this at the start and when you have to end a thread and start a new one. The only time you anchor the last step with a small stitch is to end a thread or when you have finished the line.

Step two:
Starting the twisted chain
Make the twisted chain. Place the needle a little to the left and down a thread or two from the starting thread. Bring it back up a short distance on your line. This will depend on how long you want the stitch to be.

Wrap the thread over and under the needle

With the thread to the right of the needle wrap the thread over and under the needle. Pull the needle through the fabric. 
Before tightening the stitch

Twisted chain stitch
This should be a twisted chain. Be sure the thread from the beginning of the stitch is underneath.

Step three:
Going under the starting thread
Now bring your needle up to and under the beginning thread. Do not go through the fabric. Check the direction of this stitch, the loop should be on the right of the stitches.


 Step four:

Step four
Next take the needle down into the fabric inside the loop still keeping to the right of the stitches and near the starting point. Bring the needle back out at the bottom of the stitches but not inside the loop.

Thread is now on the left of needle

The thread in the needle should now be on the left of the stitches, you can tighten the loop some but not too much.


Step five:
Loop the thread under the needle and pull the needle through to finish the stitch. If needed give the stitch a little tightening. Be sure not to pull it too tight.
Thread is looped under the needle
Finished stitch!

You are now ready to start the next stitch. If you are doing a line go to step two. If you want a single stitch anchor the last loop with a small stitch.

If this has helped you with this stitch I'd love to hear about it so leave me a comment!

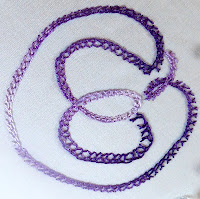
And here's my finished TAST2012 Oyster stitch scribble!

Oyster Stitch Scribble

Happy Stitching!

Rose

Sunday, July 22, 2012

Some Updates


These are continuing and I’m doing my scribbles with them. The last three are:
Bonnet Stitch
Bonnet Stitch
This is an old stitch that is not too well known. I had never heard of it but I managed to do it. I thought I would have a difficult time with it but it actually went quite well.
Up and Down Buttonhole Stitch
 Up and Down Buttonhole Stitch
This was a little more difficult for me to get going on. I had to view a video of someone (Mary Corbet of needlenthread.com) working this stitch with my laptop upside down to get the left hand aspect of it. Worked it awhile before figuring out the best way to hold my hoop and work the stitch. Now I like it. Oh the joys of being left handed!
Basque Stitch
 Basque Stitch
I watched a video (Mary Corbet of needlenthread.com) for this stitch too. It actually went quite well. I left my scribble mark so you could see the way the stitch went around the sharper points. I only had one line not two lines to stitch between.

FLOSS BOBBINS
 In my last organizing post I talked about the plastic bobbins made to wind embroidery floss on. I said I preferred the DMC ones and I still do but I have to report this incident. I needed more floss boxes to store my floss bobbins in. So, I went in search of the larger boxes. I didn’t find any but at one of the craft stores I found the regular boxes at a good price and with 50 free bobbins included. They were being sold under the DMC brand so I thought great and bought a couple of boxes. Was I disappointed – the “free” bobbins were not the same as the nice DMC ones I had previously bought. 


These were in fact far worse than the other brand I had purchased. You can see in the photo (you may need to enlarge it) that they had all kinds of problems even the slots for anchoring the threads were bad. Tsk, tsk, DMC, maybe it would have been better if you had sent them back to the manufacturer as inferior quality rather than offer them to your customers as “free”. Now I’m nervous that they are dumping their high quality products for cheaply made ones. I hope not!!

EMBROIDERY HOOPS WITH SCREWS

New Oval Hoop
Oval Hoop with Plastic Cover
I recently found two new oval hoops. I prefer the oval shape when stitching as my hand can hold it better. These secured the fabric better than my wood ones and all I had to do to protect my threads from the screw is cut a longer piece of the plastic tubing. The only think about this style of hoop is the ridge on the inside ring. I would not leave my fabric in the hoop for very long. (You are should remove the fabric at the end of your stitching session anyway.) But it you stitch for a long period of time I would recommend releasing the fabric every now and again (30 minutes?). Sometimes though I set mine down to do something quick and don’t always get back to it like I had planned. I’ll let you know how it works – I will be damp stretching my work for sure.
Inside hoop

NEW PROJECT

Yes you read right, as if I didn’t have enough going on all ready! But I took another online class, what can I say the price was right! This one was from Big Picture Classes called “Happy Go Lucky Stitchalong “ taught by Amy Powers. We’ve been working on a grid of 25 1 and ½ inch squares using mainly six strands of floss. I’ve never worked that small and I’ve never used that many strands at once. So this was a new experience for me. I’ve only done 5 of my squares. I’ll post more about this project later.

Happy Stitching!

Rose

Thursday, July 12, 2012

Organizing is a Hard Word For Me!

Not in spelling or saying but in doing and maintaining. I have people around me who are good at organizing. The problem with that is they don’t always organize for the way I work. But something has to give. I know I would get a lot more done if I could only get to a more organized, less cluttered state. Now I’m not talking minimalist here just a somewhat state. Plus my grandson is crawling now and he knows “Tutu’s Room” is full of neat, interesting stuff. So I have to be able to at least close the door.

So I’m starting and I plan to share as I go along. Maybe you’ll be inspired by something I do. I’m starting small. I have a lot of different materials to organize, threads  (both sewing and needlework), yarns, beads, buttons, buttons, and more buttons, books and magazine, tools, just to name a few. So I’m attempting to clean off my sewing/work table. Next I’ll tackle my cutting table and then the floor. Yes the floor! In the process I’m going to investigate others methods of organizing and see what might work best for me. Staying flexible is a must here!
Floss
For the organizing I’m starting with my embroidery floss. Remember I said I’m starting small. I’ve attempted various solutions in the past.

Floss on Sewing Machine Bobbins
One time I started winding partial skeins of floss on empty sewing thread bobbins. I had discovered I was using the wrong type of bobbin in my machine. Unfortunately I had purchased a lot of them. So I thought this would be a good way of using them. Not so.  For one thing I did not know the brand or color number once the floss had been removed from their packaging. So I abandoned that idea. 


Floss Bags
I’ve also tried the plastic bags on a binder ring (too bulky and the bags deteriorate over time).


Floss Bobbins

 Another attempt was bobbins made for floss which could be stacked. Same problem as my sewing bobbins although these closed so that the floss didn’t unravel. 


DMC Thread Store Displays
Another way was the old DMC store displays (a wood box with drawers that were divided to hold individual colors of floss). I was fortunate to get three of these boxes when I worked for Walmart. These are not convenient for finding colors and the floss is not protected from dust, etc. I’ll use those for something else.They hold my cards of rickrack, binding, etc. just great. 
Another idea was to wind the floss on old wooden sewing spools but I have way too much floss for this to be a good storage solution. Although they do look cute as a décor item. So you can see I’ve tried a lot of different methods.


This is what I’ve decided to do: I’m using the little flat plastic floss bobbins and the number labels (DMC).
I’ll wind the floss on the bobbin and store it in a plastic box (or 2 or 3 or 4) made for these bobbins. First I will store them by number and later by color groups. By numbers first so that once I’m done I can check my IPhone app to make sure it is up to date and accurate. And then I’ll re-sort them by color because that is the way I work. If I ever need to find a color by number I can go to my app and look up the number, that will give me a color square and name so I know where to look for it.

Thread Tracker Logo
This app Is called Thread Tracker and is for DMC floss and lets me track how many I have of each color (or if I don’t own it) and I can add it to my buy list so I know which ones I need to buy. Also if I’m at the store and see that floss is on sale I can whip out my phone and check to see which colors I need or which ones I don’t have yet. They also have apps for other types of threads so it's worth visiting their site for more information about the apps including one called Thread Replacer.

I do have some floss that does not have the number and brand notation and some where the brand is no longer being made. I am winding these on some cardboard bobbins (I bought these before I found out how thin they were). I do not recommend getting the cardboard bobbins, there are two different brands of plastic bobbins that I’ve found. The DMC brand is thinner than the other so they will take up less space. Consider this if you have a lot of floss to store. Also the other brand I have has little burrs, spots where they were punched out. DMC ones have very smooth edges.

OK this is my floss storage and the beginning of my organization story. I still have ribbon for ribbon embroidery for which I’ll probably use the same method.  You can write the color and number on the bobbins. My thread for Brazilian embroidery which is a rayon thread will be stored in the floss bags for now. That leaves my metallic floss and specialty threads to store and organize. I think the bobbins will not work well for these threads. Any ideas?
How do you organize your threads?

Next I'll be working on my fabrics. Stay tuned!

Happy Stitching!

Rose

Happy Stitching!

Monday, July 9, 2012

Color Dots Equals Color Chart


Color chart:
If you are embroidering on a printed fabric or using an applique from the fabric, clip the color dots from the selvedge to take to the store (or your supply area) to pick the colors of thread to use, either a close match or coordinating.

Selvedge with color dots

Happy Stitching!

Rose

Monday, July 2, 2012

How to avoid this:

Loose threads

I used to have lots of these “messes”. A lot of people would just toss them but not me1 After all there just might be that last piece of thread needed to finish a project. So this is what I do. I only save pieces that are long enough to work with. The rest go in my ORTS jar or to the birds to add some color to their nests.
The ones I’m keeping will be put onto a ring such as a carbone ring. I add them using an overhand knot. To do this fold the thread in half, put the loop that is formed under the ring and then pull the ends through the loop. Note: this doesn’t work so well with “slippery threads” such as rayon or nylon.
Threads on a carbone ring

You can use the ring for random threads, for threads prepped for a project, or by color. It would be a good way to see how colors work together also.

These rings can be hung from pegs on a pegboard, tacks on a bulletin board or even a hook placed near your work area.

If you use this idea for a project that you carry around with you it will take up little space.


Happy stitching!

Rose