Showing posts with label tidbits. Show all posts

Tuesday, October 13, 2020

Stitching Circles and Other Things

Buttons, yo-yos (the fabric kind), circles, rings, ovals, and round are a few of the things and shapes that I love. Needle pulling thread is a process that I can get lost in for hours!

I follow a few online groups that focus on taking small pieces of fabric and bits of threads and practice slow stitching or stitch meditation. One group focuses on stitching circles on their pieces, often adding a button or some other object in the center of their stitching. I love all the work shown and decided to use this technique on one of the patches in “Nine Patches, Five Threads Red”. I wanted to keep the button in the center. I could have sewed the button on first, but it would then be in the way of the stitching thread. So I gave it some thought, considered marking around the button, but I didn’t want to deal with making the mark disappear.
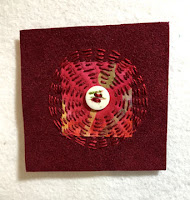
Small Patch with Circular Stitching

Then I remembered I had some round stickers about the size of the button. I placed the sticker on my patch where I wanted the button to be and stitched around it. Once I was done stitching I removed the sticker and sewed the button on. That was a good, easy solution.

Recently someone on the group asked how people get their circles so seemingly perfect. I almost responded with my sticker idea but then decided to write a little blog post instead.

Expanding on the sticker idea I purchased some larger size round stickers. You could print different size circles on a full page label, but then you would have to cut them out. Or if you are fortunate to own or have access to a cutter machine that can cut multiple circles you could probably use that. I don’t have this option, so I settled for what I had.

The stickers I bought were labeled “permanent”, so I was a little nervous about using them. The good news is the fabric has enough lint (small fibers) that the labels don’t stick permanently as soon as they are applied. If you are using a specialty fabric such as a smooth satin or silkie that may differ you could place the sticker on a fabric that is linty just to pick up some surface tension and then place it on the fabric you want to stitch.

I would caution about leaving the stickers on for a long time especially if they will be stored in a way that pressure is applied to the sticker.

Here are a few samples of using stickers as guides for stitching.

Stitching around some circle labels 

You could also cut out shapes – leaves, flowers, vines, etc. to use as a guide for stitching. Rectangular labels work great as guides also.

Leaves, button flower,  and a moon

Now about perfect stitches. I don’t aspire to making perfect even stitches on my art pieces. I like the look of a natural organic stitch. Outside of practice, practice, practice if I for some reason want perfect circles and stitches I would probably resort to an embroidery machine.

Happy sewing in circles!

Rose

Monday, October 5, 2020

Another Monday Night Tip

Well It’s past time for another Monday night tip. This one may appeal to anyone who uses a printed pattern for sewing or quilting. I discovered it when I was working on a common sewing task nowadays – mask making. This is good for anytime you are going to be using the same pattern for multiple applications or if you want to be able to see what you are doing when you fussy cut a design from your fabric.

After being a little frustrated with patterns on regular printer paper I thought what if I printed on something that was a little more durable. I had been tracing around the pattern onto some sew-in interfacing because it was a little more durable that the paper but sometimes tracing leads to slight inaccuracies. I thought what if I could print on the interfacing. 

I cut a piece of interfacing to paper size (8 ½ by 11 inches) and placed it in the paper tray of my printer. I left the regular paper in and just laid the interfacing on top. I was careful to be sure it was in straight and smooth. Then I hit the print button. It worked like a charm! I tried again with a piece that was 8 ½ by 14 because I had a pattern that was longer than 11 inches. Perfect! I printed a few more patterns without any problem.

The best thing is it saves time, they can be used over and over again, and they are slightly see through so I can fussy cut if I want.

Pattern piece printed with Sew-In interfacing


What you will need is some sew-in interfacing (not fusible!) that is slightly translucent so you can see through it. I used Pellon 910 Sew-In Featherweight Interfacing. That’s what I had on hand.

Carefully trim it to the size paper your printer can handle. Place it in the tray making sure the top edges is flush with the top of the paper tray.

If you have several pieces of pattern you would like to print you could set them up on a single sheet using any program that will allow you to add multiple images. I generally use Photoshop but you could use other graphic programs or even word. You just need to be able to add multiple images and size them correctly.

Hope this makes printing and using pattern pieces a little easier for you.

Be sure to test your printer capabilities to handle different types of paper. I use an HP Officejet Pro 6978.

I haven’t researched to see if anyone else has come up with this idea but it would not surprise me to find out that they have.


Happy sewing!

Rose

Monday, January 21, 2019

Too Practical? Maybe


Okay so now here’s an idea for those of you who use a sewing machine. Remember I warned you that some of my tips may be out there. This one may be going a little too practical.
You know it’s recommended that when you go to change your thread that you snip the thread up by the spool and then pull the loose thread out through the needle. If you pull the thread back through the machine thread lint gets into the machine. Not good. Now if you rarely change your thread like only when the spool is empty or nearly so – no problem. But if you change colors a lot like I was doing recently it seems like a waste of thread to do it the correct way. Do I just throw it away? Chop it up for the birds? Wad it up and store it somewhere – say in a baggie – until an art piece comes along where I can use it? All good ideas but then another one hit me.
I make a lot of yoyo’s, sew on buttons, and hand stitch stuffed things closed, etc. I looked at the length of thread snipped off when changing threads and realized that it’s about the length I use for hand sewing. What if I kept a few empty hand sewing needles near my machine? I could thread them with my snipped off thread and I would be ready to go next time I needed to do some hand sewing.
Thread Saver and Needle Safe

I double the thread and knot it with a single knot at the very end. If I want to sew with a single thread I just cut off the knot and re-knot one end.
Storage for me wasn’t a problem as I keep a needle safe loaded and ready for yoyo making. But I didn’t want to clutter up my sewing area any more than it already is, so I added a piece of felt around an empty spool and stuck my needles there. When I get several threaded I’ll add them to the needle safe and reload my felt with empty needles.
You could also put the felt around an empty medicine container and that way the inside of the container could hold broken, damaged, used needles and pins.
Felt and Empty Medicine Container with Needles

Enjoy stitching!
Rose

Monday, January 14, 2019

Well, Well, Well,


It’s Monday night and I have a tip for you. Well that is if you are doing French knots. Talking embroidery here.
I frequently use a lap pillow when I’m doing handwork to support my hands and wrists. 
Lap Pillow for Handwork

But when I started doing the daily Stitch Meditations I grabbed one of my small block/applique holders to contain the small pieces I was working with. These holders are just made from the purple insulation boards or foam-core boards that are then covered with either batting, felt, or flannel. I made these many years ago when my son helped me put up my design walls. We have small pieces of the purple board left over so I covered them and used duct tape (the fancier kind) to hold the fabric down and to neaten up the edges of the boards. 
Boards

You can see I have several sizes.
So one day while I was using the smaller one, I started making French knots and just happened to stick my needle into the board. The board held the needle while I tightened up my thread before I pulled the needle and thread all the way through. I found that I could even lift the knot and fabric up to the top of the needle before removing it from the board. This made for some much neater knots and more consistent knots.

Needle stuck in board while making French Knot

Pulling the thread taut for the knot

Knot ready to be finished


The finished knot:
Completed French Knot

Now if you are wanting the looser, sloppier knots this probably won’t help much. But I’ve found myself using this method more and more. I may even modify the pillow pattern to put a pocket on the bottom to hold the small board so I have it when I stitch other places than home.

And that’s my tip for today. I’m not sure I will have a new tip every Monday (some of them may seem a little far-fetched I guess) but you can always search my blog for some of my older ones.

Happy French knots!
Rose

Monday, February 19, 2018

Ribbons, Ribbons, Ribbons


It’s been over a year since I posted anything on my blog. This is like starting all over again. So here goes –
Mondays have always been dedicated to hints, tips, and tricks. This Monday I’m going to show you one of my storage ideas.
I have a lot of ribbon, I use ribbon but not every day. I’ve tried keeping them in various ways but nothing seemed to be working for me. I tried ribbon racks, ribbon bars, putting them in various containers, etc., etc., etc., you get the picture.
They just kept getting jumbled up or the ribbon would spin off the spool.
Container of empty spools
Then I ordered some acid free cardboard that are 6X6 inches and I found a container that they would fit into.
I removed the ribbon from the spools they came on and wound the ribbon onto the cardboard keeping them organized by color.
Imagine my surprise when I saw the end result. 
Side by side containers for ribbons
The empty spools take up a lot of room (I should have taken a picture of the big container they resided in before I started this project). All the ribbon from these spools fit into the small container. 
View of all the ribbons
And the best part is I just remove the lid from the new container and I can see exactly what I have. No more digging around in the spools looking for the one I want. I have room for more cardboard in this first container and I will add more ribbon to it as I come across them while I am cleaning and organizing.

Keep on stitching (and organizing)!

Rose

Tuesday, May 17, 2016

Here We Go Again!

It’s Tuesday and I meant to post this last night as one of my tips and tricks posts but I didn’t get it done (actually this was written one week ago). The tip is at the end of this post. Okay now for a little update on my UFO’s, Www.allpeoplequilt.com UFO Challenge for 2016.
March UFO Crazy Quilt

March’s number didn’t even get touched. Why? Because I was busy, busy, busy making things to go in the quilt show that my local guild holds every year. I thought I would do a little bit on that project but it didn’t happen. April came along and the number pulled was a good one – number 1 the small aloha quilt. 
April UFO Small Island Quilt

I can handle that. Not. I’m still working on it and here it is well into May. 
May UFO Birds In Flight Crazy Block

May’s number is 7 the Birds In Flight Crazy Block. Now really I should be able to get both of those done this month.
For my tip I was working on this small mini quilt to go in the silent auction held during the previous mentioned quilt show. 
View From My Window Auction Quilt

The small flowers were re-embroidered by me by hand but the fabric was not a quilt quality fabric and I was not happy with the results once I had pieced the blocks together. They were not the right size, and they were not consistent in size. So I did something I rarely do, I took it all apart and started again. Since the flower fabric was a fairly loose weave I decided to stabilize it by adding a muslin backing. I thought the best way to do that would be to use a spray on quilt basting glue. I really didn’t want to do that in the house but I didn’t want to set up a large table outside either. Then I spied this:
TV Tray

Now I know some have covered these and made them into a small portable ironing surface and/or cutting mat. My thought was to cover it with freezer paper (shiny side out) and use that as my glueing table. Worked perfectly and now I have something I can use outdoors when I’m using a spray or a glue that needs a lot of ventilation. I can also use it when I have just a little painting to do. When the freezer paper gets too bad just replace it with a fresh sheet.
Freezer Paper Covered TV Tray

How simple is that!
Oh and the quilt show? My rag dolls “The Slow Stitchers” took second place in their category Textile/Fabric Items.
The Slow Stitchers Rag Dolls


Happy creating!


Rose 

Tuesday, March 1, 2016

Monday Tip on Tuesday

It’s Tuesday and I meant to post this last night as one of my tips and tricks posts but I didn’t get it done. The tip is at the end of this post. Okay now for a little update on my UFO’s, Www.allpeoplequilt.com UFO Challenge for 2016.
Samantha Doll with refined hair

February’s number was 5. That was a good one for me because I had listed the rag doll I was making for my granddaughter. I’m happy to say that she has received her doll. It took a little bit of doing because of the hair. I had crocheted a cap and then added bangs and a lot of hair to it. Too much hair! So it was back to the drawing board with suggestions from my daughter to start over again. Well I didn’t want to take the time to start over so I stewed over it for a bit. I thought about cutting the cap and reducing the amount of hair at the same time but you know what happens when you cut into crochet work. It unravels! Hummm what to do?
Then I remembered a conversation I had with a quilter at the Houston Quilt Show. She did knitting and crocheting and then cut them up to include in her quilts. How did she keep them from unravelling – she fused them with interfacing. Ah hah! I could do the same. And I did. I’m still not 100% pleased with the hair but it is better than it was so I’m happy for now. I may make some hats with hair attached later but for now Samantha can play with her and I can move on to other works. I’m currently working on three of these dolls for another idea I had.
She Colored Everything Yellow Crazy Quilt

Oh and back to the UFO list AllPeopleQuilt pulled number 3 for March. That is my “She Colored Everything Yellow” crazy quilt. Twelve blocks are sewn and waiting for the hand embroidery. This is another project that will probably not be finished in a month but it will be moved forward.
My tip: Don’t rule out applying ideas from one discipline to another. It worked for me – from quilting to rag dolls.

Happy creating!


Rose 

Monday, January 25, 2016

Monday Tip: Don't Give Up

If you follow my blog you know I’ve been on a quest to finish projects that have been cooling at times, percolating at other times. These are referred to as UFO’s (unfinished objects), WIPs (Works in Progress), WISP’s (Works in Slow Progress) to name just a few. I’ve tried 52 in 52 (one a week), 12 by 12 (one a month), FIF (Finish It Fridays) and other ways to get things done or at least moved forward. Some items did get finished, some have been moved along. But I’ve also started a number of new items – some that were requested, some that I just wanted to try, and some that were “what-if’s”.
So here I am at the start of a new year and a new attempt at finishing some projects. A friend posted an idea on FaceBook and I was off and running. Www.allpeoplequilt.com has a UFO Challenge for 2016.

List 12 projects and what stage they are in. They choose a number from 1-12 on the 1st day of the month and that’s the project you work on that month. I can do that. 
My List for 2016

So I made my list – just writing down projects as they came to my mind. Truthfully I probably could list 24 or even 36 projects but I just did 12.
The first number they pulled was 2. Oh, oh. On my number 2 line I had listed what is probably my oldest (that I’ve uncovered so far) and most time consuming project. I was tempted to give up right then. I had hoped for one that only needed a little bit to complete and I would have success the first month to encourage me onward. I even thought about making that second list and then I would have an option to choose which ever list seemed best (read easiest). But I decided even though I would not finish it I could at least move it forward.
At first I found excuses to not work on it but then I realized I could do it – I could! So I opened the project box.
What's in the project box?

It’s a red and white crazy block style quilt with redwork in the centers. Three blocks had been sewn. All of the redwork embroidery was done. 
Where I left it in 2008

When I did those I didn’t know about the wonders of damp stretching my work (thanks Karen). So first I damp stretched all of those redwork embroideries. 

Then I had some cheater cloth of redwork squares that I had re-embroidered. For some reason (probably to protect the embroidery) I had fused some lightweight interfacing to the back of those. This caused the fabric to bubble over time. 
Cheater Cloth re-embroidered and bubbling

First I was just going to accept it as is but then I realized I could peel the interfacing off. So I was able to damp stretch those as well. The three blocks which were already sewn would have to stay as they were.
I have sewn two more blocks, and started to do the hand embroidery on one of the sewn blocks. The month is almost over and a new number will be drawn next week.
Will I put this one away? No it’s going to join my WISP’s. I’ve put the five (oh look now I'm up to six) blocks up on my design wall and I’m loving them again. When I started this project back in 2006 or 2007 I didn't have a design wall. Now I do and it is always a pleasant surprise to put something up there that I've done and let it brew for a while. It will take some time to finish this quilt – but I can do it!
Blocks on the design wall 

So I shared all of that just to say “Don’t give up, small starts count, slow progress moves you to the finish line”.

And that’s my tip for today.

Happy creating!


Rose 

Monday, July 13, 2015

OK It's Monday Night Time for a Tip

Recently I've been working on this little project.
Sunflower applique
I finished doing the leaves and petals and am about to do the center. As I looked at it I realized the fabric I had originally intended to use for the center just wasn't working for me. It seemed too busy.
So I selected a few other choices from my stash but was having a hard time deciding what to use. So I thought it would be a good idea to make a color copy of my work and also a second copy of the black and white pattern I had been using. With those in hand I thought I could cut the middle section from the black and white paper and use it as a guide for cutting out the center of the color copy of my work. Then I could audition fabrics until I found one I liked.
Well because I also make a lot of fabric yo yos I could have just cut the circles from the fabric and made yo yos from the ones I didn't use. But then not everyone likes to make those and I thought this would make a great idea for my Monday night blog post. So here are some photos to show the results. (Sorry the photos are not that great but I think you will get the idea.)
Photocopies of the project and pattern
Original fabric choice
Fabric is too light
Color doesn't seem right
Fabric is a little bit better
Maybe?
Planning to use this one because I want it to be dark.
So there is where I'm at. I think I may look through my stash for some more dark browns to try. I definitely want a dark brown.
I could also have just scanned the fabric in and used my computer to try out different ones but I didn't have my computer with me so I did it this way.
Happy Monday
Rose


Monday, March 23, 2015

Just Bobbing Along

Homemade Bobbin Holder 
A long, long time ago I asked my husband to make me something to keep my sewing bobbins on. I had a lot of them and they were always getting tangled up because I kept them in a drawer or on my sewing table. I had purchased one of those blue bobbin keepers but I had way more bobbins than it could hold. So he put his creative head to the task and made me a holder for many, many bobbins. More bobbins than I had and then he bought me more bobbins. I used to do a lot of sewing with different colored threads so they came in handy.

Then a long time ago I found out I was using the wrong bobbin in my sewing machine so I bought some more bobbins of the correct size. But I had all of these already filled bobbins and couldn’t bring myself to waste them or the thread that was wound on them. So I carried them from home to home.

Bobbin Holder Hanging on Pegboard
When we put up pegboards in my sewing room in Texas I hung my thread racks and then figured out a way to hang the bobbin rack my husband had made for me.
Recently I was packing up a “to go” project (in this case it was making fabric yoyos or Suffolk puffs). I was adding thread spools to my small carry case and thought there should be a better way because the spools took up a lot of room. Then I spied my incorrect bobbins with thread on them. Perfect I thought I’ll start using that thread up. 
Bobbins with little thread, poorly wound thread, and wrong size
Then I realized I had some correct bobbins that only had a little bit of thread left on them. Now you know if you use those in your machine sure enough you will run out of thread before you finish sewing the seam. Ok I can use those up too! And then there is the few where the bobbin didn’t wind properly. Add those to the mix.
But I didn’t want to just put the bobbins in with the yoyos because the thread would just get all tangled up. What to do? Remember that blue bobbin keep I mentioned earlier? Perfect.
Blue bobbin keeper with threads
Now I’m making use of the bobbins and thread and the blue bobbin keeper.
What will happen though to all the empty spindles on the tool my husband made me? Well as you can see by my photos small spools of thread fit on them nicely.

Happy Bobbing Along!
Rose 

Monday, March 9, 2015

Why I Keep Blue Painters Tape in my Sewing Room

 Aha you thought I forgot about my blog!
Not so. I check it every now and then and think “you know I really need to start posting more often”. Well here I go again and since it is Monday and that means hints and tips here goes.
I started making a project that required layering the top fabric, batting, and a piece of muslin. Does that sound like a quilt? Well not exactly. The pieces were only 18 inches square but they did need to be quilted. But the quilting needed was only 4 inches apart. I really didn’t want to mark my lines with anything other than my trusty Jergens soap sliver. Won’t go into all the reasons why here but I didn’t want to wash the square before I completed the project and washing it after was possible but not likely to happen. Only problem was I couldn’t find my soap sliver. Ok now what. I have a quilting guide that might help if only I could find it. Does that sound like someone needs to do some serious cleaning and organizing? Not going to happen right now I want this project done. Well I did find the guide but it wasn’t going to give me the 4 inch spacing the pattern called for. Now what to do? And then I spied my handy roll of blue painter’s tape.


Using blue painters tape to mark stitching lines
That will work just lay it down straight and stitch along the edge. Worked like a charm. Just watch which side of the tape to stitch along to get the desired spacing. I was done in no time.
And I won’t waste the tape. It won’t be thrown out until I’ve filled it up with stray threads. Yup it does double duty as a thread catcher. You can also write notes on it. I have a piece stuck to my machine right now to remind me what settings I need on my machine to do my ¼ seams.
Okay I’m planning to come back on Wednesday with some photos etc. of what I’ve been working on lately including this project (which is now finished).

Happy Crafting!
Rose 

Monday, January 12, 2015

It’s Monday and I have a tip for you!

Well that is if you are in to crocheting or knitting hats with earflaps that needs braids. I was making one of these for my granddaughter this December.
Grandson wearing reindeer hat I made him
The first one came out a little too small and the second one was a little too big but that’s okay because she will be able to use it at the end of this year too! Then I made a third one for a friend’s daughter.
Many strands are needed for the braid
While working on them I struggled with the yarn for the braids, I think I used a crochet hook the first time to pull the yarn lengths through the opening in the crochet. Then I thought there must be an easier, faster way of doing this. I considered using a yarn needle or some form of large eyed blunt needle but I still wouldn’t be able to pull all 12 strands (three of each of four colors) through at the same time. What to do?
Then I remembered I had purchased these:
Floss Threaders to the rescue
I planned to use them for something else (I think it had to do with threading needles) that didn’t work out. But I thought they would be perfect for the task at hand. And they worked!
I love when I can take something intended for another purpose (in this case cleaning teeth) and use it for something entirely different. Has this ever happened to you?

Happy Crafting!
Rose 

Monday, October 13, 2014

Golf Tee to the Rescue!

What? A golf tee? But I don't golf!
Extra Long Golf Tee
Okay, I know you all think I’ve lost it but I was doing some work the other day with a small item that needed to be turned right side out and this is what happened. I turned the item and then needed something to push the corners out, etc. I just happened to have an extra long golf tee that was sent to me in an order of regular tees (these tees are used in my Needle Nabbers which by the way will be on sale in my shop until the end of the month. Need to clear the way for a new and improved design!).
Pink Needle Nabbers
I grabbed the extra long golf tee and it worked perfectly! Didn’t poke through the fabric, it was great.
Then I had to stuff the item (remember it’s small as in the pincushion for my Close at Hand wristpincushion).


Close At Hand Blue Pincus
How’s that two plugs! Well I again grabbed the golf tee and used the top where the golf ball sits to push the stuffing and the bottom to get the stuffing up into the corners.
.I also used it as a scoring tool on some card stock! Who knew such a simple item could be sew handy!

And one final (for now) use: use it to hold your fabric (like a stylus, I think there’s another word for this but I can’t think of it right now – lol!) as you are feeding it through your sewing machine.


Happy Stitching and Crafting (You never know what you’ll find around you house to use as a sewing/crafting tool!)


Rose