Showing posts with label projects. Show all posts

Monday, July 8, 2019

Winging It Creatively


This goes out to all my friends who sometimes (or maybe always) wing it when working on a creative piece. I’m not one of those people who plan everything out in detail before starting. I tend to dive in and go for it. Of course I do have a habit of thinking and thinking and thinking about something before I actually start doing it but once I start anything can happen.


I’ve been working on a couple of small art quilts using my Stitch Meditations. The meditations were started with no thought of how they might be used, they were just quick (well maybe not so quick) stitching using scraps of fabric and threads. As they progressed though they started presenting themselves as something more and I just had to go with it. Even to the point of not doing stitch meditations on a daily basis. I will get back to that though because I really enjoy it and they seem to spark more ideas.

So I just started seeing how I could put some of these little pieces together. For one I knew I wanted a “white-whitish” background using strips of different white and white-on-white fabrics in varying widths. I wanted to quilt the background using straight – well sort of straight – lines. I originally thought I would do lines very close together but when I just did lines ¼ to ½ inches apart I decided that was the look I had in mind. See less is more as one of my art teachers always told me. I had a tendency to throw everything but the “kitchen sink” into my work. So she always encouraged me to remove something. Nowadays I’m trying to use that principle more and more.

Okay the background is done, now to attach the stitch meditations. Once I had arranged them the way I wanted I noticed the ones in the four corners had a little curve to them and if I arranged them just right it gave a hint of a circle to the piece.

After looking at it on my design wall for some time I thought I wanted to add some stitching on the background to add to the circle effect. After talking with some friends and getting their opinions (some saw what I was getting at, others had other ideas I could try) I went with my original idea and finally dove in and started stitching.
I wasn’t too pleased with the way it was looking but since I had put in the beginning stitches I had to commit to them (I was afraid if I pulled them out I would have big pukas (holes in Hawaiian) that would be difficult to hide. The thread I was using was DMC Pearl cotton size 8 and the needle was fairly thick.
After I started and did the bottom section and part of one side I put it up on the design wall. I liked it but the stitching was a little wonkier than I wanted. I wanted a very organic circle not a perfect circle.
Light bulb moment: I really should have put it up on the wall and then determined where my stitching would be placed. It would have been easier to see where the line should be rather than looking at it flat on the table. I could have used a string or tracing paper to get it placed better. With the tracing paper I penciled in the lines on the paper and then made a few marks for guides and then cut out the tracing paper.


Now it was time to mark the background. Remember the background is white. I did not want my markings to show. I did not want to use an erasure or water to remove the marks. Then I remembered my Hera tool. That will make a small crease in the fabric that will stay there until I have finished stitching. Perfect.


I’m done stitching and I’m not sure it had the effect I was hoping for but it’s done.
Next time I think I would test it out on a small sample first. And of course I have the tips for marking now that I can use at the beginning of the project rather than in the middle!

I’m thinking I may like it better if I added another circle inside the circle and another one inside that. But for now it’s done.

I can always come back and add more circles if I want to because:

Less is more but sometimes, just sometimes, more is better!

Enjoy stitching!
Rose

Tuesday, May 17, 2016

Here We Go Again!

It’s Tuesday and I meant to post this last night as one of my tips and tricks posts but I didn’t get it done (actually this was written one week ago). The tip is at the end of this post. Okay now for a little update on my UFO’s, Www.allpeoplequilt.com UFO Challenge for 2016.
March UFO Crazy Quilt

March’s number didn’t even get touched. Why? Because I was busy, busy, busy making things to go in the quilt show that my local guild holds every year. I thought I would do a little bit on that project but it didn’t happen. April came along and the number pulled was a good one – number 1 the small aloha quilt. 
April UFO Small Island Quilt

I can handle that. Not. I’m still working on it and here it is well into May. 
May UFO Birds In Flight Crazy Block

May’s number is 7 the Birds In Flight Crazy Block. Now really I should be able to get both of those done this month.
For my tip I was working on this small mini quilt to go in the silent auction held during the previous mentioned quilt show. 
View From My Window Auction Quilt

The small flowers were re-embroidered by me by hand but the fabric was not a quilt quality fabric and I was not happy with the results once I had pieced the blocks together. They were not the right size, and they were not consistent in size. So I did something I rarely do, I took it all apart and started again. Since the flower fabric was a fairly loose weave I decided to stabilize it by adding a muslin backing. I thought the best way to do that would be to use a spray on quilt basting glue. I really didn’t want to do that in the house but I didn’t want to set up a large table outside either. Then I spied this:
TV Tray

Now I know some have covered these and made them into a small portable ironing surface and/or cutting mat. My thought was to cover it with freezer paper (shiny side out) and use that as my glueing table. Worked perfectly and now I have something I can use outdoors when I’m using a spray or a glue that needs a lot of ventilation. I can also use it when I have just a little painting to do. When the freezer paper gets too bad just replace it with a fresh sheet.
Freezer Paper Covered TV Tray

How simple is that!
Oh and the quilt show? My rag dolls “The Slow Stitchers” took second place in their category Textile/Fabric Items.
The Slow Stitchers Rag Dolls


Happy creating!


Rose 

Monday, July 13, 2015

OK It's Monday Night Time for a Tip

Recently I've been working on this little project.
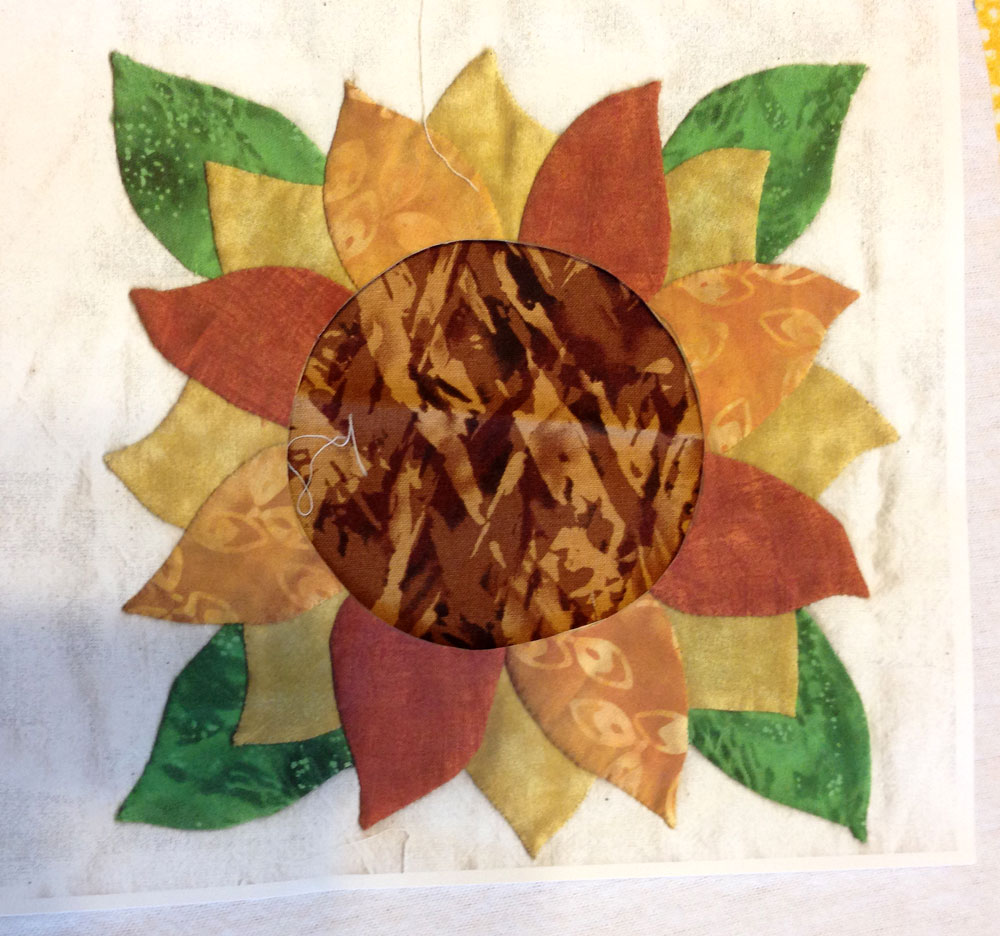
Sunflower applique
I finished doing the leaves and petals and am about to do the center. As I looked at it I realized the fabric I had originally intended to use for the center just wasn't working for me. It seemed too busy.
So I selected a few other choices from my stash but was having a hard time deciding what to use. So I thought it would be a good idea to make a color copy of my work and also a second copy of the black and white pattern I had been using. With those in hand I thought I could cut the middle section from the black and white paper and use it as a guide for cutting out the center of the color copy of my work. Then I could audition fabrics until I found one I liked.
Well because I also make a lot of fabric yo yos I could have just cut the circles from the fabric and made yo yos from the ones I didn't use. But then not everyone likes to make those and I thought this would make a great idea for my Monday night blog post. So here are some photos to show the results. (Sorry the photos are not that great but I think you will get the idea.)
Photocopies of the project and pattern
Original fabric choice
Fabric is too light
Color doesn't seem right
Fabric is a little bit better
Maybe?
Planning to use this one because I want it to be dark.
So there is where I'm at. I think I may look through my stash for some more dark browns to try. I definitely want a dark brown.
I could also have just scanned the fabric in and used my computer to try out different ones but I didn't have my computer with me so I did it this way.
Happy Monday
Rose


Friday, July 10, 2015

Just Another Friday Post At Long Last

It’s Friday Again! Let’s Move It Forward and Finish It.
Oh hello there!
I haven’t been around blog land for some time now. Some of you know I’ve been going through some different seasons in my life and well blogging just got moved aside. But I’m back!
Seasons have different phases and this season is no different. From caring intensely for a loved one to losing that loved one to a better world to trying to find where I want and where I need to be, this has been a trying season. I’m not sure where my writing will lead. I may even start a new blog, a new page so to speak. But for now I think I will just try and get back into the habit of blogging.
So since it is Friday here’s where I’m at stitching wise. I haven’t finished anything but I have moved forward on a few items. Funny when I started my Finish It Friday posts based on words of wisdom my paternal grandmother imparted to her family (see this post) I thought I was being different. I almost wrote unique but really is anything really unique? Since then I have found other bloggers who have being doing a Finish It Friday style post for years.
Well back to mine. I didn’t do any stitching for about 3-4 months. Why? I don’t really know. But I finally did get back to picking up needle and thread. Hand-stitching is my focus right now because my sewing space is in a mess due to reorganizing and relocating it. My machine is not set up so I can only move things forward to a certain point until I need to sew on the machine.
I took a workshop class through my quilt guild on back-basting applique taught by Barbara Eikmeier. I pulled it out and started working on the class project a little bit at a time. (Well I’m trying to do my 15 minutes a day method but some days I don’t manage any stitching and other days I’m at it for an hour or more.) Here it is in process.
Sunflower Applique
Today I will finish appliqueing the petals down. Next will be the center and then some embellishment. You might notice in the lower right hand corner that I have a little challenge. When I was adding the border applique I cut it in the wrong place and so I have a little dip that should not be there. What will I do? The choices are:
  1. Leave it
  2. Cover it up with some embellishment/applique
  3. Un-stitch it and redo it
What will I do? Stay tuned to find out.
Summer Hexagon Wall Hanging
Next up is my Summer Hexagon Wall Hanging. This I started a few years ago with embroidery designs from Wild Olive to which I made my own changes. I’ve now finished sewing the hexagons together and will be layering it with batting and a backing and then hand quilting.
Hand Embroidered Doll Faces
Oh yes and I’ve embroidered some more doll faces. Just need to rework the body pattern, cut and sew.
Shashiko and Butterflies Wall Hanging
While moving things around in my sewing room I came across a piece I had started when I still lived on the Big Island of Hawaii. I’ve decided to continue on with it since it requires some handwork. I’ve debated back and forth about the butterflies. Should I embroider them or should I applique them as the pattern called for? When I took it out to look at I was surprised to see that I had started to back-baste the pieces down just like the workshop instructor I mentioned above taught. I know the original instructor for this piece had us using a different applique method. How did I get started back-basting it in Hawaii? I don’t know. But I’m moving forward with it.

Until then,
Happy Moving Forward and Finishing!

Rose 

Wednesday, January 7, 2015

WWW Where Do I Start?

Should I just do a recap of what I’ve been up to since October 15, 2014? What? October 2014! Ok so I’ve posted some things in my FIF posts so I won’t bore you with those again but I have done some things during the holiday season that I will share with you.

First I worked at getting the bookmark for our 2015 quilt guild meetings designed and printed. I’m happy with the results. 


Me taking photos
I also took photos of the donation quilt that will be for the guild’s 2015 season. I needed photos for the postcard I create for the quilt guild’s annual festival of quilts show. When I get those I will post a picture of the front and back.

Besides working on those I crocheted 20 drink cozies for the “Meet Samantha” party. I thought I took a photo of them being used but I can’t find it so I will have to do with this shot.

Pink, Grey, White Drink Cozies
This was in addition to the 24 mini crochet dresses I showed in an earlier post. And then I put together some bunting/pennants/banners things for the party. These will be used to decorate Samantha’s room.


Flags getting ready to string together
 Oh that reminds me I made a cloud and hearts mobile for her room too (well that’s not completely finished but close!). And again, no photo.

In addition to all of that I managed to get the final blocks for the 2014 block exchange at our guild finished.
Christmas block

Civil War Reproduction Block
 Then my son asked me to make some finger-less gloves for the homeless they planned to feed on Christmas day. Well he asked for knitted ones like I had made as a gift for him last year but when I started I discovered it would take too long (this was a last minute request). Plus my right hand is not taking too great of a liking to my marathon knitting or crocheting. In the meantime my son and friends felt led to do a much larger scale meal for a low income housing unit. So he really needed more than 10. I got the bright idea to use fleece and so I made 40 sets of fingerless gloves for him to give away.
Some of the fleece finger-less gloves
 And let’s not forget there is the doll I’ve been working on. I have another one of those ready to embroidery the face and I’ve been playing with hair on the original one.

One other thing I started was some fabric microwave bowls. The test ones are okay but when I washed them they didn’t look as great as they did when they were first sewn. I’m still experimenting with the size for these. I did make one that is great to hold my small bowl of ice cream so I don’t freeze my fingers off. So they are good for other things than just the microwave. I’ll share more about those on another day.
Reindeer hats being worked on

Oh yes and I made some of these hats but I will share more about those on one of my Monday tips post.

Okay that’s enough I think to show I really have been working.

Happy Stitching (on Wednesday and every other day)!


Rose

Wednesday, October 15, 2014

WWW Check In

Just a quick peek at some of what I’ve been working on lately.
Bathing Elephant Original Scribble and Embroidery

First there is the scribble Bathing Elephant embroidery that I’m almost done doing the basic lines. After that I will soak it in water to see how the wash-out printer interfacing works.
Fabrics for Mystery Quilt

Then I’ve also been pulling fabrics to consider for the Bonnie Hunter's 2015 Mystery Quilt. I’ve never done a mystery quilt before so this should be interesting.
Homemade Libby's Pumpkin Cookies

Finally cookies wound up on my plate today. I was hoping to get my thee year old grandson involved with the baking but instead I had to go it alone. These are mainly for a stitching group I belong to. We meet tomorrow and it’s my turn to bring the snacks.

A little bit of straightening up has been happening along with cutting 5 inch fabric squares for a quilt for my grandson.

Happy Stitching (on Wednesday and every other day)!


Rose

Wednesday, October 8, 2014

Hello there! WWW

Well I haven’t posted a WWW (What I’m Working on Wednesday) post in like forever – well not since May anyway. Does that mean I haven’t been working on anything? No of course not and if you’ve visited my Finish It Friday posts you know I’ve been doing a little bit anyway.
Okay so what have I been working on since May? Here’s a brief (I think) rundown of some of the works:
  1. The butterfly vest – all embroidery is finished. I just need to add some sequins, beads, and maybe a few more stitches, and then maybe line it.
  2. The monochromatic bird nest – some stitching has been done on the bird nest part but I haven’t worked on it in a while.
    Bird Nest Embroidery
  3. The summer hexagon wall hanging – the hexagons have been stitched together and now I’m working on adding some border half hexagons etc. Again I put it aside for a while. I’m debating my choice of fabric for the final round. I thought it looked like shiny, sparkly beach sand but now I’m not so sure. I plan to use the same fabric for binding.
    Summer Hexagon Wall Hanging
  4. The crazy quilt elephant block – a lot more detail has been added but I still have more to go. It gets picked up every now and again. I finally had to print out a copy of it and scratch some notes on it so I could remember what I planned to do to it.  Notice the upper left corner tie fabric. I couldn’t decide what to do on that seam allowance and so I tried to imitate the fabric. This is an idea I’ve been toying with, it isn’t perfect but it’s a great future reference.
    Notes
    Elephant Crazy Quilt Block
  5. The crazy quilt blocks for “She Colored Everything Yellow” have also had a little detail added to them (well to one of them). Bullion loops, French knots, buttonhole stitch and more. I really need to get busy and give them some undivided attention.
    She Colored Everything Yellow Crazy Quilt Block
  6. Embroidery has really taken over my creative life lately. Can you tell? All of my Finishes have been of small embroidery.
  7. I’ve finished embroidering the Love sampler, just need to put it in the framing hoop and I’m done!
    Love Sampler Embroidery
  8. The scribble “Elephant Bathing” that I did when I was a teenager has taken on a new life as an embroidered piece. Right now I’m just using it to test out a product. I have a feeling I will be doing more than one or two pieces based on that scribble.
    Bathing Elephant Scribble
  9. In the mix is a scrappy quilt for our guild’s “wounded warrior project”. I agreed to do one that was all cut out from donated fabric. The pattern is Bonnie Hunter’s Pineapple Blossoms.
    Wounded Warrior Blocks in Process
  10. What there’s more? Yes indeed. I have been busy making little tiny crochet dresses to be used as favors when my granddaughter gets introduced to the world (well to friends and family of the mom). She’s due to arrive in two weeks! Her ‘met the baby’ party won’t be until December though.
    Mini Crochet Dresses
  11. Also crocheting some tiny doilies to finish off some already made needle “nabbers”. They just need to be added to the pots before they are glued onto a wood circle and little ladybug buttons need to be glued to the flowers. Then they are off to a quilt shop in Hawaii!
    Mini Crochet Doilies
  12. Okay I need to make this an even dozen. What else is there? Oh yeah that’s right, I worked on trying to make my daughter a sleep mask. Wasn’t too successful in that department. The first one was too small and the second one was too tight.
    Sleep Mask

Not to worry though there are more projects waiting in the queue!

Happy Stitching (on Wednesday and every other day)!


Rose

Monday, August 11, 2014

And Now For the Rest of the Story:

Or how this piece evolved.
Scribble Leftover Embroidery

If you read my blog you may have read this post or this one. When working on a project I will cut off a working length of floss and then separate each strand and combine the number of strands I want to use – usually 2 or three (floss normally has six strands). I then slip the unused strands through the hole on the thread bobbin.
Cut floss on bobbin hole

This works fine until I am finished with that color on that project. I’ve tried putting these leftover threads on carbone rings but I wound up with several rings hanging around and the thread not being used. 
Leftover floss on carbone ring

I then considered leaving the extra threads looped on the bobbin and just wrapped around it. That was okay until I finally got around to putting all of my (well most of it) floss on bobbins and storing them in plastic boxes. Organization here I come! Oh happy day! But the extra thread didn’t work well in the boxes so it was back to the drawing board.
Cut floss wrapped around bobbin

Then it came to me! Use it up! Of course! But how? If you’ve seen any of my embroidery work you probably know I love to use scribbles. They are the perfect use it up solution! I can happily mix colors and since it is all abstract I can pretty much do whatever I want on them. It would also be a good way to see how colors work together – or don’t. And these would be the perfect spot to use up all of my “I don’t know what brand or color number this thread is” floss. Or I can try out or practice stitches on them. Or I can do all of the above.
So that’s how this piece got started.
Working embroidery scribble

First I grabbed a piece of fabric and a marker and scribbled. I used a hoop I planned to use for framing to be sure the scribble would fit inside.
Then I did a backstitch and a Rose’s illegal backstitch following the lines of the scribble with black floss. I had thread left over from the butterfly vest project which I’m almost finished with. (I’m just adding some glow-in-the-dark thread, a few sequins and some beads and then I’ll be ready to line it.) 

So I started with that thread and one of the inside sections of the scribble working an uneven running stitch (I’m not too good at keeping my stitches even – lol). When I ran out of one thread I started another. I decided to stick with just straight stitches on this scribble. Once that section was full of running stitches 
I went to another section and did an almost satin stitch leaving gaps in between each row. (I drew addition lines with my blue marking pen just for guidance.) 

Next I went to the smaller inside section and started using a scattered seed stitch changing colors as I went. I noticed the effect I was getting with the different combinations of color. I will definitely use this technique in other projects!
Seed scatter stitch
While I was working on this someone mentioned the scribble looked like and onion and an eggplant. So I decided to use a concentration of purple for the rest of the scribble to enhance the “eggplant look”. I did dip into my collection of unknown threads for this part. 
I needed another type of straight stitch to use and I wanted to use something I had not done before. I thought about my long desire to learn the short and long stitch. I’ve checked it out before but for some reason the directions in my stitch books just didn’t clue me in (it was more my lack of really concentrating on the instructions that jammed me up). So I picked up my favorite book, The left-handed embroiderer’s companion by Yvette Stanton, (she has it for right handed people also). Flipped to the page for the stitch and saw what to do. Mainly because she used a different color for each row and she shows several rows being done. 
Wonderful! I started out at the top narrow end and worked a few rows. I was delighted! This is definitely going to be one of my favorite filler stitches. I was so happy with it I had a hard time putting it down after working for fifteen minutes (this was one of my fifteen minutes a day projects).

Gap in the stitching
 (click on image to see it better)
Due to the irregular shape of the scribble I had to do some fiddling with it and probably should have started in the middle of each row and work my way to each side but this wasn’t aimed for perfection, this was a learning work. I did wind up with a few noticeable gaps but it was easy enough to go back and fill them in. 

Towards the end I decided to try switching to another shade of purple and then a third one. That worked out fairly well also. This was definitely a worthwhile project not only for using up leftover thread but also for trying something different.
Changing shades of purple on eggplant
Oh and one more thing. Here’s a picture of the back of my work. 
Back of embroidery work
Now I don’t often show the back since I’m not a stickler for no knots or that the back should be as nice as the front. I don’t use the juicy fat knots I was taught as a child but I do knot my thread with a simple overhand knot pulled tight and clipped close to the knot. And I do knot at the end also. But anyway notice on the back of this piece the double line of black running stitches? This was caused by my “illegal backstitch”. And I like the look of it so I took a photo just to have it to remind myself that I would like to try that look on one of my scribbles rather than a solid black one.

You may need to click on the photo to enlarge it in order to see the details.

Happy creative stitching with leftovers!
Rose