Showing posts with label satin stitch. Show all posts

Monday, August 11, 2014

And Now For the Rest of the Story:

Or how this piece evolved.
Scribble Leftover Embroidery

If you read my blog you may have read this post or this one. When working on a project I will cut off a working length of floss and then separate each strand and combine the number of strands I want to use – usually 2 or three (floss normally has six strands). I then slip the unused strands through the hole on the thread bobbin.
Cut floss on bobbin hole

This works fine until I am finished with that color on that project. I’ve tried putting these leftover threads on carbone rings but I wound up with several rings hanging around and the thread not being used. 
Leftover floss on carbone ring

I then considered leaving the extra threads looped on the bobbin and just wrapped around it. That was okay until I finally got around to putting all of my (well most of it) floss on bobbins and storing them in plastic boxes. Organization here I come! Oh happy day! But the extra thread didn’t work well in the boxes so it was back to the drawing board.
Cut floss wrapped around bobbin

Then it came to me! Use it up! Of course! But how? If you’ve seen any of my embroidery work you probably know I love to use scribbles. They are the perfect use it up solution! I can happily mix colors and since it is all abstract I can pretty much do whatever I want on them. It would also be a good way to see how colors work together – or don’t. And these would be the perfect spot to use up all of my “I don’t know what brand or color number this thread is” floss. Or I can try out or practice stitches on them. Or I can do all of the above.
So that’s how this piece got started.
Working embroidery scribble

First I grabbed a piece of fabric and a marker and scribbled. I used a hoop I planned to use for framing to be sure the scribble would fit inside.
Then I did a backstitch and a Rose’s illegal backstitch following the lines of the scribble with black floss. I had thread left over from the butterfly vest project which I’m almost finished with. (I’m just adding some glow-in-the-dark thread, a few sequins and some beads and then I’ll be ready to line it.) 

So I started with that thread and one of the inside sections of the scribble working an uneven running stitch (I’m not too good at keeping my stitches even – lol). When I ran out of one thread I started another. I decided to stick with just straight stitches on this scribble. Once that section was full of running stitches 
I went to another section and did an almost satin stitch leaving gaps in between each row. (I drew addition lines with my blue marking pen just for guidance.) 

Next I went to the smaller inside section and started using a scattered seed stitch changing colors as I went. I noticed the effect I was getting with the different combinations of color. I will definitely use this technique in other projects!
Seed scatter stitch
While I was working on this someone mentioned the scribble looked like and onion and an eggplant. So I decided to use a concentration of purple for the rest of the scribble to enhance the “eggplant look”. I did dip into my collection of unknown threads for this part. 
I needed another type of straight stitch to use and I wanted to use something I had not done before. I thought about my long desire to learn the short and long stitch. I’ve checked it out before but for some reason the directions in my stitch books just didn’t clue me in (it was more my lack of really concentrating on the instructions that jammed me up). So I picked up my favorite book, The left-handed embroiderer’s companion by Yvette Stanton, (she has it for right handed people also). Flipped to the page for the stitch and saw what to do. Mainly because she used a different color for each row and she shows several rows being done. 
Wonderful! I started out at the top narrow end and worked a few rows. I was delighted! This is definitely going to be one of my favorite filler stitches. I was so happy with it I had a hard time putting it down after working for fifteen minutes (this was one of my fifteen minutes a day projects).

Gap in the stitching
 (click on image to see it better)
Due to the irregular shape of the scribble I had to do some fiddling with it and probably should have started in the middle of each row and work my way to each side but this wasn’t aimed for perfection, this was a learning work. I did wind up with a few noticeable gaps but it was easy enough to go back and fill them in. 

Towards the end I decided to try switching to another shade of purple and then a third one. That worked out fairly well also. This was definitely a worthwhile project not only for using up leftover thread but also for trying something different.
Changing shades of purple on eggplant
Oh and one more thing. Here’s a picture of the back of my work. 
Back of embroidery work
Now I don’t often show the back since I’m not a stickler for no knots or that the back should be as nice as the front. I don’t use the juicy fat knots I was taught as a child but I do knot my thread with a simple overhand knot pulled tight and clipped close to the knot. And I do knot at the end also. But anyway notice on the back of this piece the double line of black running stitches? This was caused by my “illegal backstitch”. And I like the look of it so I took a photo just to have it to remind myself that I would like to try that look on one of my scribbles rather than a solid black one.

You may need to click on the photo to enlarge it in order to see the details.

Happy creative stitching with leftovers!
Rose


Friday, March 14, 2014

Wow it’s Friday already! Time for FIF:Finish It Friday!

I’m back to trying to finish some items on Friday. First up are the three Flash Cards I’ve been trying to finish for several weeks now. So fabric in hand and sewing machine at the ready here we go!

Flash Cards to finish

Next I’ve selected some embroideries I had done since April of 2011. Yes 2011 and the only thing they needed was to get permanently framed in hoops. Only thing was I wanted the hoops to be black. When I first tried painting a hoop the paint didn’t take well so I laid it all aside. Now I’ve sanded the frames, painted them black and I’m ready to go with the finishings. 

Embroidered Hawaiian Petroglyphs

I’ll be back later to show the results (hopefully).

Happy Finishing Friday!

Rose 

Saturday, June 22, 2013

Oh No! Not Again?

 Hmm, I’m thinking I need to stop getting on the internet, Facebook, Pinterest, Flickr, and blogs. Oh the blogs! Okay I went and started yet another project. I really would like to force myself to finish something before I can start a new something but there’s too much eye candy and too much fabric and thread tempting me.
So I’m cruising the web and come across a Summer Stitching group, well I can stitch all year long but this one just caught my eye. I must confess that I really wanted to see what the setup was and how it operated. And well the creator was offering the “class” at a discount so there you go.
The creator is Mollie at Wild Olive and the “class” is really booked as a “club”. I’ve seen Mollies work around for some time and love her cute little faces on everything. Just couldn’t resist them. We’re making hexagon blocks (something I’ve never done) with hand embroidery (something I’ve done since forever) on some of them.
It’s a summer theme and each week we get a new embroidery design to work and turn into a block. I’m keeping up (kinda , sorta– need to prepare some more of non-embroidered ones). Here are the first three embroidered ones.

Embroidered "Cat" Sunglasses
I couldn’t resist turning the sunglasses into a fifties style with cat eyes. 


Embroidered Intense Sun


For the sun I did more than just an outline stitch, I thought since the summer sun is so intense it needed some pumping up so I did a satin stitch with a ring of French knots inside and added some French knots to the ends of the rays. I think this is my favorite so far. 


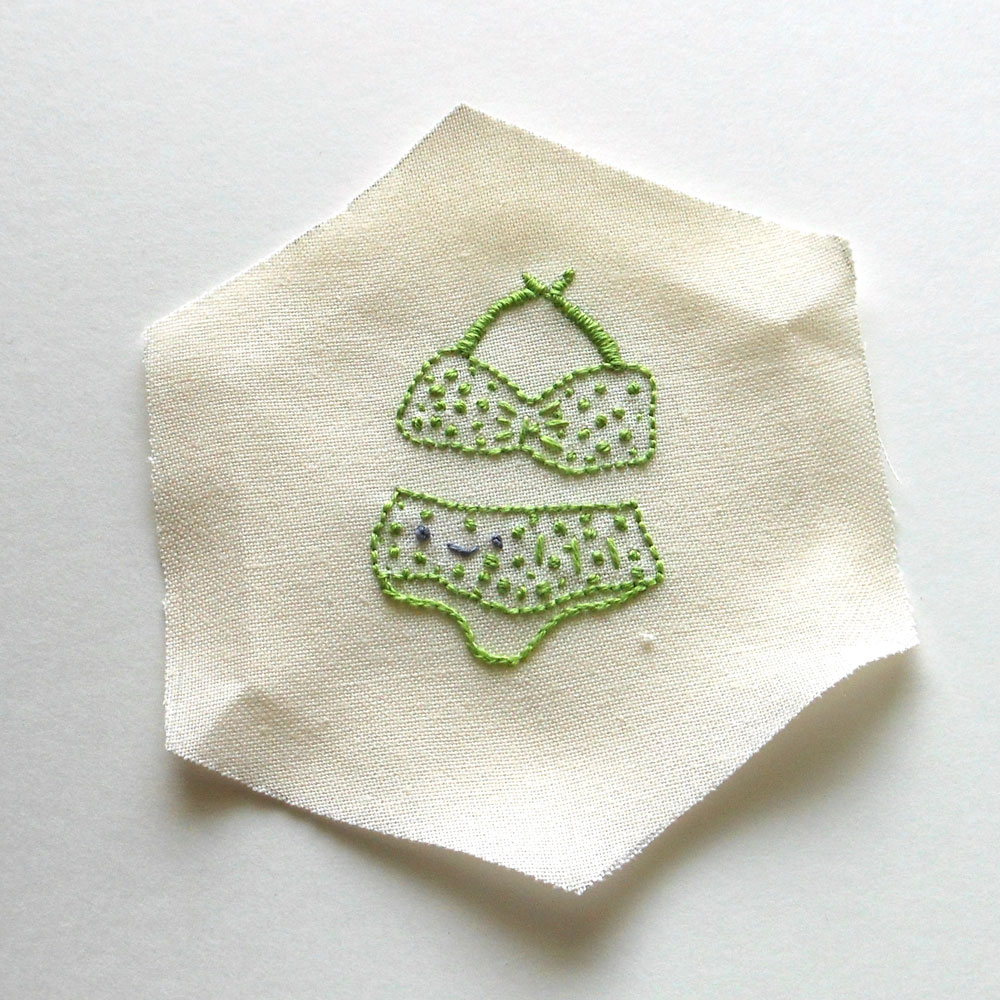
But then there’s the swimsuit. Haha just couldn’t get the song “she wore an itsy, bitsy yellow polka dot bikini” out of my mind.
Embroidered Polka Dot Swimsuit
Okay well it’s not really a bikini and the polka dots are lime green rather than yellow you you get the point.

Here’s the background fabrics I’m using ,I’ll probably bind it with a sandy fabric. I might do a small border with some deep red. The rose flower fabric is fussy cut so that I have flower(s) in the center of each hexagon.
The blue is for my swimming pool which I am very much enjoying this summer and the green is for the shade of my trees.

Summer fun!

Happy Stitching!


Rose

Saturday, April 7, 2012


See I Can Do This!

Back again with an update to TAST 2012:
This week’s assignment was the satin stitch. This is a stitch I’ve used a lot and so it came fairly easy. First I did my scribble (for a while I was calling this doodling but realized it’s really a scribble that I sometimes doodle in with thread and color). I tried to keep it simple as I really wanted something I could finish quickly. When I stopped and looked at it there seemed to be a bird of sorts looking back at me. So I decided to go with that idea.
But Is It a Bird? Satin stitch sampler

The satin stitching was done in rows using my favorite color yellow in variegated pearl cotton. Then I did the beak as it appeared again with a satin stitch and some orange pearl cotton. The eye was done with French knots using black DMC thread and white pearl cotton. Using some variegated blue pearl cotton a encapsulated the bird with a chain stitch. I love how it came out but I’m not sure it’s a bird (at least any known bird) so I named the piece “But Is It a Bird?”.  I’m still considering filling in the rest of the body.

Other happenings:

I’ve been trying to make a driver’s cap for my grandson Jaden with my own modified pattern. Commercial patterns are sized for a one year old or larger and he’s only 6 months. The hats are either too big or too small. Finally I made one to fit his head but the sides of the hat are too short so back to the drawing board!
Jaden 
I did get a cushion covered for him that gives just enough support under his jumper so he can rest his feet and jump. He won’t be needing it for long though!

Now for a praise report!
My son had surgery to place implants in both the top and bottom gums. They found more bone than expected and so were able to do all of it at once. Praise God! After not having any teeth for so long he looks great! You can read more about it at Mo’ Bettah Smile.

I have just finished reading “One Thousand Gifts” by Ann Voskamp. What an amazing book! I’ve started my own list and hope to incorporate some of them in my embroidery and collage work. My daughter gifted me with the book as a thank you (one of many I’ve received from her) for watching her son Jaden (my grandson is welcome in my home and heart any time!).

  1. Sunshine and Rain
  2. Flowers that bloom
  3. Baby snuggled sweet in my arms
  4. Giggles

That’s all for now! Be back Monday with a tip that I think embroiderers will like. At least those who work with a hoop that has a tightening screw.

Happy Easter and Happy Stitching,

Rose