Showing posts with label creative. Show all posts

Wednesday, November 13, 2019

Small Communities


A while back I had the idea to put together some small kits for fabric collage work. 
The stARTer Collage Kit

I finally got around to doing this and used a few to test out my instructions with a small group of friends. They were my "alpha testers". They enjoyed the process and we had a pleasant afternoon working on them. My directions were not finished but we did our best. Here's a photo of the results. 
The work of the first testers

One member enjoyed it so much that she has continued the process at home. Here's a photo of her work.
Donna Atkins addition work

This Thursday I spent an evening with one of my small communities. Our main emphasis is art. We do a variety of handwork and machine work from painting to weaving, knitting to crocheting, embroidery to quilting, etc. You get the picture – that’s why our group name is EtCetera. So for this session I had agreed to do little stitch meditations using my art collage kits. I had plenty for them to choose from and each kit contained 4-5 small pieces of fabric along with 3-5 colors of perle cotton thread, a felt backing and some needles. A rough draft of my instructions was also included.
The hope was they would be my beta testers and give me some useful feedback on the kits. That hope was definitely realized.
Collages from the EtCetera Group

Even though I was exhausted from working late the night before and from early in the morning preparing the kits I left with a feeling of satisfaction and well-being. Was that from the success of the kits? No.
It was from a sense of community. As the group of about 15 ladies sat around the table working out their designs and stitches, they carried on with conversations about life. Not politics, not religion, just life in general. One person shared a bit of joy that had happened in her life, we thought about our “leader” who was unable to attend due to her husband recently having surgery. But mostly the conversation dwelt around animals, both wild and domestic and their antics and interactions with each other and with humans.
It was a very enjoyable and relaxing evening. I think we, as humans living in a very busy, sometimes disjointed age, need to have more of these small community gatherings where we just work with our hands and engage in chit-chat.
More collages from the EtCetera Group
I meet with a number of small groups loosely formed around the bigger world of quilting however it wasn’t until this meeting that I used the words “small community” to describe these gatherings. That to me is what we are – small communities doing life together.
One of the participants said “the group wound up chatting like magpies, telling stories, and laughing while we stitched. I really didn’t want to leave”.
More collages from the EtCetera Group

The youngest member of the group came up to me at our guild meeting to show me her finished piece although she said it wasn’t finished she wanted to put a backing and binding on it to turn it into a coaster. Her mom said she had already taken over her piece to “fix” it for her and that the daughter was planning on doing even more to use as practice pieces to improve her stitching. I was thrilled because that is my strongest wish to encourage and give young people the thrill of hand stitching.


Keep on stitching and sharing!
Rose

Monday, July 8, 2019

Winging It Creatively


This goes out to all my friends who sometimes (or maybe always) wing it when working on a creative piece. I’m not one of those people who plan everything out in detail before starting. I tend to dive in and go for it. Of course I do have a habit of thinking and thinking and thinking about something before I actually start doing it but once I start anything can happen.


I’ve been working on a couple of small art quilts using my Stitch Meditations. The meditations were started with no thought of how they might be used, they were just quick (well maybe not so quick) stitching using scraps of fabric and threads. As they progressed though they started presenting themselves as something more and I just had to go with it. Even to the point of not doing stitch meditations on a daily basis. I will get back to that though because I really enjoy it and they seem to spark more ideas.

So I just started seeing how I could put some of these little pieces together. For one I knew I wanted a “white-whitish” background using strips of different white and white-on-white fabrics in varying widths. I wanted to quilt the background using straight – well sort of straight – lines. I originally thought I would do lines very close together but when I just did lines ¼ to ½ inches apart I decided that was the look I had in mind. See less is more as one of my art teachers always told me. I had a tendency to throw everything but the “kitchen sink” into my work. So she always encouraged me to remove something. Nowadays I’m trying to use that principle more and more.

Okay the background is done, now to attach the stitch meditations. Once I had arranged them the way I wanted I noticed the ones in the four corners had a little curve to them and if I arranged them just right it gave a hint of a circle to the piece.

After looking at it on my design wall for some time I thought I wanted to add some stitching on the background to add to the circle effect. After talking with some friends and getting their opinions (some saw what I was getting at, others had other ideas I could try) I went with my original idea and finally dove in and started stitching.
I wasn’t too pleased with the way it was looking but since I had put in the beginning stitches I had to commit to them (I was afraid if I pulled them out I would have big pukas (holes in Hawaiian) that would be difficult to hide. The thread I was using was DMC Pearl cotton size 8 and the needle was fairly thick.
After I started and did the bottom section and part of one side I put it up on the design wall. I liked it but the stitching was a little wonkier than I wanted. I wanted a very organic circle not a perfect circle.
Light bulb moment: I really should have put it up on the wall and then determined where my stitching would be placed. It would have been easier to see where the line should be rather than looking at it flat on the table. I could have used a string or tracing paper to get it placed better. With the tracing paper I penciled in the lines on the paper and then made a few marks for guides and then cut out the tracing paper.


Now it was time to mark the background. Remember the background is white. I did not want my markings to show. I did not want to use an erasure or water to remove the marks. Then I remembered my Hera tool. That will make a small crease in the fabric that will stay there until I have finished stitching. Perfect.


I’m done stitching and I’m not sure it had the effect I was hoping for but it’s done.
Next time I think I would test it out on a small sample first. And of course I have the tips for marking now that I can use at the beginning of the project rather than in the middle!

I’m thinking I may like it better if I added another circle inside the circle and another one inside that. But for now it’s done.

I can always come back and add more circles if I want to because:

Less is more but sometimes, just sometimes, more is better!

Enjoy stitching!
Rose

Wednesday, May 21, 2014

Here We Go Again!

Oh goodness I've been missing in action for so long.  I have been busy, I have been doing things. Here are some of the blocks that I've made for our guild monthly block exchange.
Red and White Block for April


Flower Basket Block for March
This is a little card that I worked on for another on-line exchange I participated in. I was late with it as I forgot what the deadline was and thought I had longer to work on it. Oh dear. But I did get it done.

Postcard for online swap

The project was to do a postcard that included paper and embroidery so I designed this little card. I had some postcards for my inkjet printer that I had purchased a long time ago and then never used. Perfect. Then I remembered my sketchbook with a little flower design I had worked on, again some time ago. I thought it would look great as a card. The other part of the challenge was to focus on the word create so I added some words to the card. After I printed the design I decided to color in the flowers with some markers.  Then came the fun of deciding what stitches to use and then piercing the paper. About halfway though I remembered I like to keep the first of any new idea I make. So I printed another card and this time added the hummingbird to it (another one of  my little sketches!). When it came time to embroider the hummingbird I opted for some metallic thread. It was a little tricky to work with but I love the results.  I received this one from my exchange partner who lives in England.
Postcard Exchange from England
I'm still trying to straighten up and get somewhat organized in my "studio room". I may have a new idea to share later about fabric scraps. Testing it out now. 

I've been rather busy with my quilt guild lately, mainly working on promoting the show that took place May 1 and 2. It was a good experience for me and I also got involved in the take down. What a lot of work goes into putting on a show! I still have some things to finish for the guild and we are already talking about next year's show.

I haven't done any Finish It Friday posts because I haven't finished anything on Friday lately. (Well I haven't started anything new on Friday either!)

For my 15 minutes a day project I've been concentrating on this vest.
Butterfly Denim Vest WISP

I've blogged about it before here. One thing that I keep reminding myself of is to keep track of the thread colors I'm using. I started this about 15 years ago - what!!?! I can not find the blue thread that I used on it to begin with. I have found a DMC light effects thread that comes close but that thread is a little more difficult to work with than the regular floss. But I'll manage. Right now I'm concentrating on doing an irregular running stitch on the lines within the butterflies. Here is a view of two butterflies, one has been stitched and the other one has not. I think doing the stitches adds a lot to the look of the butterfly. Why an irregular running stitch? Because I don't seem to be able to keep my stitches perfectly even in length! Plus I think irregular is more interesting than perfect. 


I keep thinking I need to add some flowers among the butterflies but that will mean an even longer time before this is finished. I do wear this vest every once and awhile just because I can.
Well that's just some of what I have going on at the moment. 

Happy Stitching!
Rose

Thursday, January 9, 2014

What I’ve Been Working On Wednesday

I know, I know it’s Thursday. Still trying to get on track with my postings. I’ve been busy doing some design work for the Quilters’ Guild of Arlington. No not a quilt! A postcard for our upcoming May Festival of Quilts Show and a bookmark detailing our meetings, workshops and general information.
I haven’t used Photoshop for any design work for quite a while. It’s been a re-learning process and of course I just jumped right in with no pre-planning. That reminds me of why I should do some paper sketching first I think. I was in a hurry last minute deadline you understand. Now in hindsight it probably would have gone a lot faster and smoother if I had paused to sketch my ideas first.

Front of the Post Card
Here’s my results. 
Thankfully they were well received!
Back of the Post Card
 If you will be in the Dallas area the first part of May (May 2nd and/or 3rd) come check our show out!
 
Bookmark Front
Bookmark Back
Other than that I’m just trying to straighten up my work area so I can find things and get more sewing/quilting/crafting done. Still have a little more to do and then of course organizing everything will take a little more time. My husband’s comment was “wow now we can actually see the floor and walk around in here!” I think I’ll take some pictures when I have it done and post them up so I can remind myself of how good it looks de-cluttered and hopefully encourage myself to keep it that way. We shall see!


Happy Designing (and straightening up if you are like me)!


Rose 

Saturday, November 23, 2013

A Trip Down Memory Lane


Rose 
Well hello there! That’s me back in 1956. Age 10. Occasion – the first dress I made by myself. It won the district Singer Sewing contest and went to regional. We couldn’t afford the trip to regional so I had to have a photo of me wearing the dress accompany it to St. Paul/Minneapolis.
My mother who was an excellent seamstress decided it would be better to have someone else start me on my sewing journey. I made little fashion doll (fore-runner to the Barbies of today) clothes on my working toy sewing machine but now I was going to learn to use a real honest to goodness sewing machine. So she enrolled me at the local Singer Sewing center. I was allowed to pick out my fabric and my pattern. It was not the easiest pattern but my mother never discouraged me she just let me forge ahead. Typical of my mother really, she decided to learn to knit in her 70’s and when she picked out the pattern she wanted to do her senior center instructor tried to discourage her. But she was determined and she succeeded much to the instructor’s amazement! That’s just the way she rolled.

So off I went to the class. The ladies teaching were knowledgeable but when I started to cut out the pieces they decided to have a gossip feast in the corner of the room. Well when they finally checked on me they were horrified to see I was cutting off the hem. I was following the fold line rather than the bottom, an honest mistake for a 10 year old I think. Well there wasn’t enough room to scoot the piece over so they just had me use a bias binding to turn the hem up. They had a bit of explaining to do when it came to the judging part. But at least they owned up to it!
Sleeve detail with trim and covered button

I still have the dress, and I am always amazed at the detail in it, from covered buttons on the sleeves, to handmade binding trim around the sleeve and the sleeve tabs, to turned under seam edges (we didn’t have sergers back then!), it looks like a lot of work.
Seam edge turned under and sewn


Even the gathering was protected from raveling 

Sweet little button detail echoing the fabric design
I still have the handwritten critique that I received and the prize which was a zippered case with three Singer scissors. The case is a bit ratty and I’m not sure I have all three scissors but it’s still a treasure to me.

What prompted this trip down memory lane?

Well I was watching Karen in one of her Simply Stitch videos and she had made a printed copy of some of her fabric work and was incorporating it in her paperwork cutouts. I had my little pin pricked fashion illustration dress in mind and the light bulb went on. I could do something like that with my first dress and so now I have another idea to work on to put in my ledger. Oh the ideas just keep coming!

Close Up of the Fabric

Be back soon!

Happy stitching


Rose 

Thursday, November 21, 2013

I Love Needle Piercing!

Okay how many of you when you read that thought of body piercing and thought no way, not Rose!?

Ha ha, you’re right I’m not doing body piercing no way, no how but I am piercing paper. And I really enjoy it even though I’m not really, really good at it yet like my instructor is. Yes I’m taking another online class (well it really isn’t a class, no particular assignments, we’re just flies on the wall watching how she works). The she? Well it’s Karen Ruane of Contemporary Embroidery. I’ve taken a couple of other classes from her and I love her work and her way of teaching.
She does a lot of embroidery and paper piercing among other things and gives us plenty of eye candy almost on a daily basis. If you visit her blog you’ll see what I mean.

So here’s my projects so far:

Geometry Flash Card Triangle

  • I’ve been thinking about seeds and seed pods a lot lately. I’m not sure if it is the season or what but it did start when I was making the geometry flash card with triangles. It just seemed like the one with the seed stitch had all these little seeds trying to escape the triangle only to fall back down because of the enclosure.
Seed Pod Rough Sketch


So I went on a search for seeds being released from their pods and one thing led to another. I wound up with a sketch of sorts.


I started transferring it to my acrylic paper with needle piercing and went a little overboard. Not exactly thinking ahead here. I did manage to do some cutout sections for which I embroidered some white cloth with white thread. The embroidery has been attached and some French knots added to the paper. There’s more work to be done on this piece but I find that I need to let it rest and then when I start again I am happier with what has been done.
Seed Pod Progress

  • Watching Karen work gave me another idea for working with a fashion illustration I did when I was in college. I’m trying to find the book source for the original dress but I know I took it and scaled it down a few times and then traced the sketches as dresses dancing down a line and then tried to color them and give them pattern and texture.
    Dress Illustration
    I’ve always wanted to do something with this illustration and now I am inspired to work with it on paper as a needle pierced piece. At the same time I remembered my first dress I ever made (I was 10 years old), I thought that would be great fabric to photograph and then add as inserts into the paper design. Oh the little red thing laying in the photo I'll tell you about that later in my tips and tricks!


One final project for now is a scribble of mine that I have pierced into paper and stitched with white thread. I’ve done the cutout and now need to decide on how to back them. I have two ideas. One came from just accidentally laying the cutout on top of my notebook which gave me an idea for some type of stained glass effect. The other again just happened when I laid the cutout over the top of my seed pod sketch. Now to decide.

Overlay of notebook
Overlay of seed pod sketch
I have a lot more work to do including a special order for a button bracelet and quilt squares that need to be done soon so I’d better get busy.

Be back later!

Happy stitching or piercing!


Rose 

Monday, November 4, 2013

September, October, Where Did You Go?


So I was going to blog in October about how September just came and went. Now it’s already November so September and October have both appeared and vanished for another year.
My original intent was to blog about the past revisited. It started with a  request from my daughter to make a costume for my grandson. He had been invited to a woodland themed birthday party and she wanted a gnome outfit for him.
Ok I can do that after all when she was little I made her a Pilgrim outfit, a butterfly and a Snow White costume. The Pilgrim outfit I had a pattern to guide me, the butterfly was made from a craft magazine pattern and the Snow White was just my own creation using what I had at hand. When she was a butterfly I realized I didn’t have anything for her brother who was still at the crawling stage. Then I spied and old ugly green sheet (think 70’s) and whipped up a caterpillar outfit for him. When she was Snow White I made him into a Prince Charming again at the last minute.
Oh Tutu I don't think so! Gnome prototype
So I finally got around to tackling the gnome. I had a rough idea in my head for this but I had to make a few prototypes first. I discovered he did not want anything around his mouth so the mustache I had planned was out. My daughter was a little dubious about how I was constructing the beard because I used a piece of stiff interfacing just to get the length and width. The hat I made was droopy and she wanted a pointy hat. So I made an insert of the stiff interfacing to make the hat stand up. The beard was made from an unused mop. I cut some strings from the mop and sewed/glued them to some twill ribbon. One end of the ribbon was sewn to the  hat and the other end snapped onto the other side of the hat. The hat was made from fleece so it had some stretch to it.
Mama and her little gnome
Then came the shoes which I had not planned to do but was requested the morning of the party. So back to the drawing board. They almost didn’t happen. We wanted them to slip over his regular shoes so I traced around the sole of the shoe and then came up with a way to encase the shoe with felt. I intended to put some wire to make the toe ends curl up but we wound up just pinning them with safety pins. The belt was made from some leftover vinyl I had and a buckle was made from the stiff interfacing.Everything else was store bought. I thought it came out pretty good for a last minute project. I’m still working on perfecting the shoe pattern. I’ll share it when I’m done.
The reason I was so late in posting this is I was trying to find the photos I had of my young children in their costumes. No luck so far so you’ll just have to settle for a picture of my grandson in his appearance as a little gnome.
The gnome in the garden


All photos courtesy of my daughter. For more on this project see her blog Little Girl Dancing!


Happy Stitching!
Rose

Saturday, June 22, 2013

Oh No! Not Again?

 Hmm, I’m thinking I need to stop getting on the internet, Facebook, Pinterest, Flickr, and blogs. Oh the blogs! Okay I went and started yet another project. I really would like to force myself to finish something before I can start a new something but there’s too much eye candy and too much fabric and thread tempting me.
So I’m cruising the web and come across a Summer Stitching group, well I can stitch all year long but this one just caught my eye. I must confess that I really wanted to see what the setup was and how it operated. And well the creator was offering the “class” at a discount so there you go.
The creator is Mollie at Wild Olive and the “class” is really booked as a “club”. I’ve seen Mollies work around for some time and love her cute little faces on everything. Just couldn’t resist them. We’re making hexagon blocks (something I’ve never done) with hand embroidery (something I’ve done since forever) on some of them.
It’s a summer theme and each week we get a new embroidery design to work and turn into a block. I’m keeping up (kinda , sorta– need to prepare some more of non-embroidered ones). Here are the first three embroidered ones.

Embroidered "Cat" Sunglasses
I couldn’t resist turning the sunglasses into a fifties style with cat eyes. 


Embroidered Intense Sun


For the sun I did more than just an outline stitch, I thought since the summer sun is so intense it needed some pumping up so I did a satin stitch with a ring of French knots inside and added some French knots to the ends of the rays. I think this is my favorite so far. 


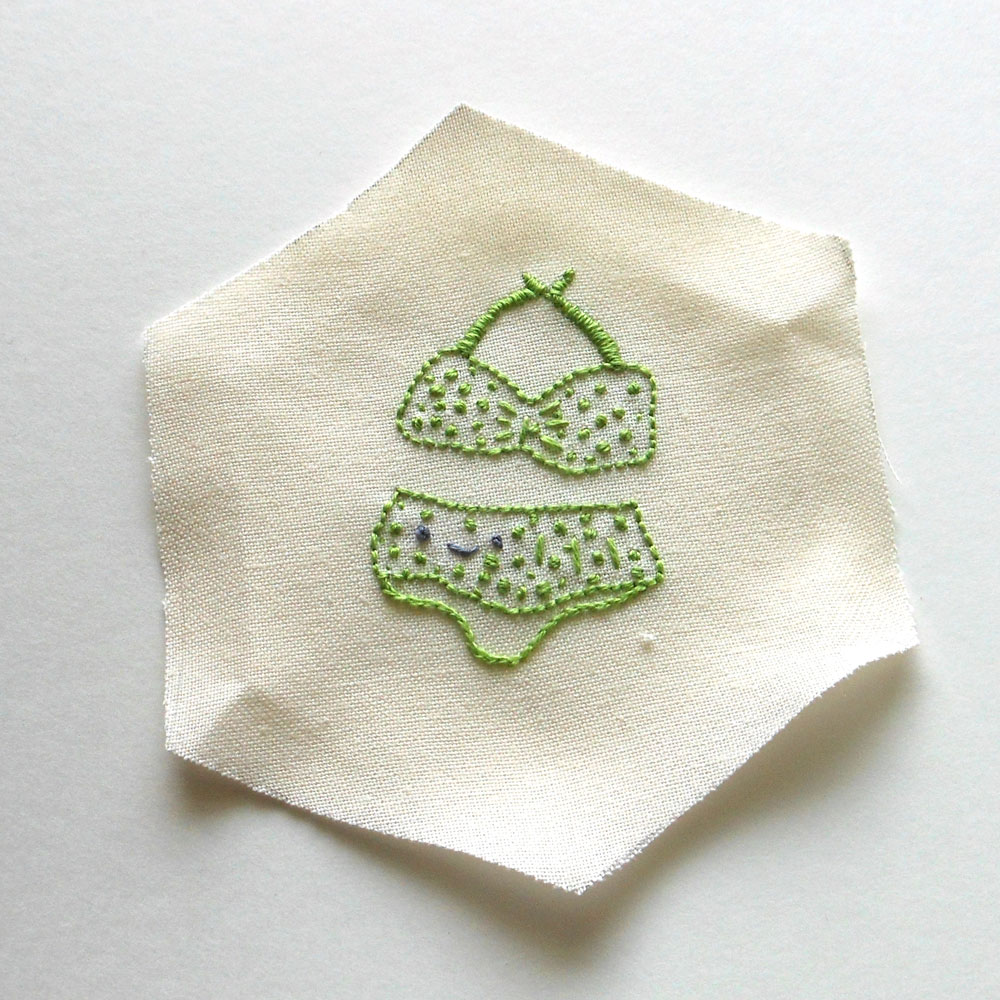
But then there’s the swimsuit. Haha just couldn’t get the song “she wore an itsy, bitsy yellow polka dot bikini” out of my mind.
Embroidered Polka Dot Swimsuit
Okay well it’s not really a bikini and the polka dots are lime green rather than yellow you you get the point.

Here’s the background fabrics I’m using ,I’ll probably bind it with a sandy fabric. I might do a small border with some deep red. The rose flower fabric is fussy cut so that I have flower(s) in the center of each hexagon.
The blue is for my swimming pool which I am very much enjoying this summer and the green is for the shade of my trees.

Summer fun!

Happy Stitching!


Rose
Thursday, March 7, 2013

Ideas and Solutions

Small Embroidery Single Strand

Recently I started working on small embroidered pendants. At the same time I’m testing out working with just one strand of floss. I’ve been wanting to try my hand at needle or thread. When I read some of the writings from these types of artists they said they used only one strand at a time. Hmmm. I’ve used two strands a lot but never one. Last year I took an online class where we were encouraged to use all six strands at once. I had never done that either. So from one extreme to another. I wanted to try something small to see if I liked using just one strand (didn’t really like using all six). I do! So I think I’ll try a kit next and then venture out on my own.


Handi-Wipe
While checking out other artists I came across one on Facebook who was using a Handi-Wipe to protect her work. She said it was to protect the fabric from the hoop. She made it twice as long as the width of the hoop plus some extra, the width was wide enough to fit in the hoop with a little extra. After placing it on top of her fabric and then into the hoop she cut out the middle of just the Handi-Wipe so the fabric where she wanted to do her stitching was exposed. When she put her work aside she laid the extra length over the hoop to protect her work. I thought this was interesting.

Finished Pendant
When I started working on my pendants I was marking the outline of the part that the embroidery would cover on my fabric. After assembling a few of them and seeing how close my embroidery was coming to the edge (and sometimes even being covered) I realized the problem was I was using the inside insert rather than the top frame. The top piece had a rim around it which of course covered up the edge of the fabric. Solution: use the inside of the rim of the top piece for marking the area available for embroidery.

Pendant Frame and Insert

Solution
My next concern was marking this area. I didn’t want to risk having some of the marking showing when I was finished. I knew I could mark it lightly on the back and then do a running stitch around it and follow that stitching on the front and then remove it when I was finished. But that was extra work and I wanted to streamline my process. And then the light bulb went on!
How about using the Handi-Wipe and cut the center out to fit the inside of the frame? Perfect! I might try using some nonwoven sew-in interfacing next and see how that works.
Love finding solutions to problems and faster and better ways to do things!

Happy Stitching!

Rose

Sunday, March 3, 2013

What Happened?


Wow it’s March already! Well we’ve been sick at our household. Not much fun. But I thought I’d better pop in here and let you know I have accomplished some work.

For Christmas I made a pair of fingerless gloves for a friend. Oops forgot to take a picture She also received a scarf. The gloves were crochet, the scarf was knitted. Both techniques I haven’t done for a while so it was fun picking up the hook and needles again, especially the needles.

Another Christmas present was a pair of extra-long fingerless gloves for my daughter. I crocheted that too! Again I didn’t take a picture. Plus they came out too small for her so I have to redo. She did get a boot cuff that fit. Oh and also a knitted cowl. I’ve made a few more of those. My daughter said hers also came in handy when she was sick she used it to keep her chest warm.

I also made a hat for my grandson and a crayon roll up. 


Crayon Rollup


He also got a dapper outfit (well a onsie) from his tutu.
Polka Dots and Stripes
I’ve been testing out a new embroidery project, scribbles and such in pendants. I’ll be posting photos soon and also have a new tip to share (maybe tomorrow).

Tiny Violets
And I’ve started working on another Crazy Quilt for the CQ2013 Journal Project. I’ve constructed all of the blocks first, all 12 of them. Now to get the first three embroidered and embellished before the end of March. I’m using my “Oh look, she colored everything yellow” project for this so all my blocks are black, yellow, and white. I’m liking it so far. I think I will practice a different family of stitches on each block as I need practice in that area.

Finally I’m still trying to sort and organize my “stuff”.

Happy Stitching!

Rose

Sunday, April 3, 2011

I've Been Busy

French Knot Closeup
Pin It
Bird's Eye View
The beginning owl doodle
Well kind of busy. I did get my owl embroidery and my Bird’s Eye View done. Like I said in my last post I can sit and stitch for hours. I get lost and love what is happening with the thread and the stitches. The more I thought about this the more I realized how often I’ve heard sayings that revolve around “Do what you love …” theme. And I’ve been convinced for a long time now that most of us discover what we love to do in our childhood. The only problem is we forget, get bogged down in other things, listen to the voices of well meaning family and friends and turn our backs on the “what we love”. This is true for me. I learned to embroider at a very early age (7) from a lady(my mother) who also had a love for it starting at a very early age. I moved out on my own in the late 60’s to San Francisco no less – that’s right - home of the hippies! I did not pick up my needle and thread at that time. Too bad! I did do some work in the early 70’s for my youngest brother and I still have a shirt I made and embroidered for him. It still looks pretty good; too bad I don’t fit into it. I have memories of things I worked on as a child and as a young girl. A few of these items are still with me today. While going through my stash of unfinished items I was surprised to see how many revolved around embroidery. And I am so happy to be back in the groove again!
Owl on Vintage Fabric

Faux Lava Rocks on "Lava Fabric"

One of the items I came across had nothing to do with embroidery. Here is some muslin I painted with a textured paint that was called lava. My original intent was to make some beads that looked like lava but were lightweight.


They kind of worked and I’m not sure where I was thinking of using them maybe on my woven necklace. But looking at that fabric gave me an idea. So now it has become my inspiration fabric. I’m not sure if I will actually use it but I decided to try my idea on regular fabric first. 

Here’s the first of a series of work I plan to do. I will probably sell both the readymade and the patterns once I have a few worked up. I think they are coming out quite nicely.
Big Island Hawaiian Petroglyph #1

And I discovered another piece of the painted fabric I didn’t remember I had. Haha!
However I’m so far behind on my 52 projects that I think I better start doing more work and less thinking.
Bone Rings and Button Blanks


Okay I’m off and running on another idea to accommodate my needle habit which I like to carry with me to work and other places. I was looking for some bone rings (well now they’re made of plastic) that I’m sure I had (that’s how I discovered my other piece of painted fabric!). I finally found them after muttering under my breath several times “I guess I have to go to town because I really want to make this – today”. In amongst them I found a button blank (part of a button that didn’t get to actually be a button) that would work just as well as the bone ring I was looking for. Now I’ve got another recycle, reuse, repurpose item! Just love it when that happens! And I know I have a lot of them somewhere but I’ve found enough to get me started. So now I’m off to my sewing machine to make it so I can take it with me tomorrow. You’ll just have to wait to see what I’m doing.

Happy stitching!