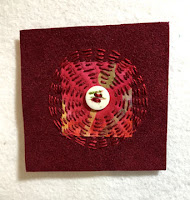
Buttons, yo-yos (the fabric kind), circles, rings, ovals, and round are a few of the things and shapes that I love. Needle pulling thread is a process that I can get lost in for hours!
I follow a few online groups that focus on taking small
pieces of fabric and bits of threads and practice slow stitching or stitch
meditation. One group focuses on stitching circles on their pieces, often
adding a button or some other object in the center of their stitching. I love
all the work shown and decided to use this technique on one of the patches in
“Nine Patches, Five Threads Red”. I wanted to keep the button in the center. I
could have sewed the button on first, but it would then be in the way of the
stitching thread. So I gave it some thought, considered marking around the
button, but I didn’t want to deal with making the mark disappear.
 |
| Small Patch with Circular Stitching |
Then I remembered I had some round stickers about the size of the button. I placed the sticker on my patch where I wanted the button to be and stitched around it. Once I was done stitching I removed the sticker and sewed the button on. That was a good, easy solution.
Recently someone on the group asked how people get their
circles so seemingly perfect. I almost responded with my sticker idea but then
decided to write a little blog post instead.
Expanding on the sticker idea I purchased some larger size
round stickers. You could print different size circles on a full page label,
but then you would have to cut them out. Or if you are fortunate to own or have
access to a cutter machine that can cut multiple circles you could probably use
that. I don’t have this option, so I settled for what I had.
The stickers I bought were labeled “permanent”, so I was a
little nervous about using them. The good news is the fabric has enough lint
(small fibers) that the labels don’t stick permanently as soon as they are
applied. If you are using a specialty fabric such as a smooth satin or silkie that
may differ you could place the sticker on a fabric that is linty just to pick
up some surface tension and then place it on the fabric you want to stitch.
I would caution about leaving the stickers on for a long
time especially if they will be stored in a way that pressure is applied to the
sticker.
Here are a few samples of using stickers as guides for
stitching.
 |
| Stitching around some circle labels |
You could also cut out shapes – leaves, flowers, vines, etc. to use as a guide for stitching. Rectangular labels work great as guides also.
 |
| Leaves, button flower, and a moon |
Now about perfect stitches. I don’t aspire to making perfect even stitches on my art pieces. I like the look of a natural organic stitch. Outside of practice, practice, practice if I for some reason want perfect circles and stitches I would probably resort to an embroidery machine.
Happy sewing in circles!
Rose


